
Redux is a powerful library that allows developers to manage the state of their applications in a centralized and organized way. With the complexity of modern web applications rising, centralizing application state in React will make it simpler to test, debug, and maintain your code. Welcome to the world of React and Redux! If you are looking to build scalable and maintainable applications with React, then this guide is for you.
In this introduction to Redux, we will explore what Redux is, why it is important, and how it can be used to centralize the state of your React applications. In this article, we’ll be introducing you to the basics of Redux, how it can streamline the management of your application state, and providing you with a clear and concise walk-through on how to implement it in a React application. So, let’s dive in and learn how to make your applications more efficient and streamlined with Redux!
What is Redux?
Redux is a state management open-source library for JavaScript applications, most commonly used with React. It provides a centralized store for managing application state and allows for predictable state management using a strict unidirectional data flow.
In other words, Redux provides a centralized place to store all the data needed by an application, which can be easily updated and monitored, leading to more organized and maintainable code. By implementing Redux in your application, you can simplify the management of complex state, making it easier to track changes and debug issues.
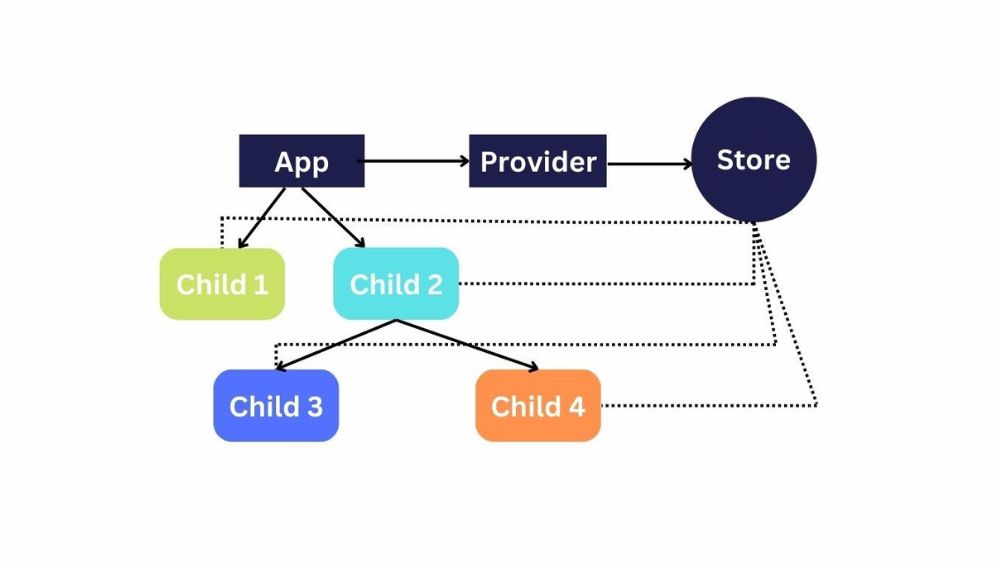
Centralizing Application State in React
In React, centralized application state is typically managed using the state management library Redux. The basic idea is to have a single source of truth for the entire application state, which is stored in a centralized store. Components can access the state using selectors and dispatch actions to modify the state.
1. To create a store folder in your React project, first open your React project in a text editor or IDE. Right-click on the root directory of the project and select “New Folder.” Name the folder “store.” Inside the store folder, right-click and select “New File.” Name the file “store.js.” Open the store.js file and start adding your store logic.
2. To import the createStore method from the Redux library in the store.js file. By importing this method, you can use it to create a store for your application’s state.
The createStore method in Redux is one of its core methods for creating a centralized store for an application’s state. By importing this method and creating a store, you can manage your application’s state in a centralized, predictable, and efficient way.
3. Define the initial state of your store in the store.js file. Define a constant variable that will hold the initial state of your store in the store.js file,.
By defining the initial state, you provide a starting point for your application’s state, and you can use this initial state as a reference for future changes to the state.
4. Create a reducer function that takes the current state and an action and returns the new state based on the action type. It takes the current state of your application and an action and returns a new state based on the type of the action.
By creating a reducer function, you define how your application’s state will change based on different actions, and you provide a single source of truth for the state of your application.
Read Also: Top 5 Python E-commerce Framework
5. Create the Redux store by passing the reducer to the createStore function. By passing the reducer function to the createStore function, you are creating the Redux store for your application’s state. The store will keep track of the current state and handle updates to the state through the reducer function.
6. At the component file, import the useSelector and useDispatch hooks from the react-redux library. The useSelector hook is used to access data from the Redux store, and the useDispatch hook is used to dispatch actions to the store. By importing these hooks, you can use them in your component to access and update the state in the Redux store. This allows you to write components that are connected to the Redux store and respond to changes in the state.
7. To get data from the Redux store in a React component using the useSelector hook, you need to call the useSelector hook in the component’s render function and pass a selector function as an argument to it. By using the useSelector hook, you can easily access data from the Redux store in your component, and your component will re-render whenever the data in the store changes.
8. Use the useDispatch hook to dispatch actions to the store. To dispatch actions to the Redux store in a React component using the useDispatch hook, you need to call the hook in the component’s render function and store the result in a variable.
The dispatch function will pass the action to the store, which will then use the reducer function to update the state based on the action. The updated state will then be propagated to all connected components, including the component that dispatched the action, causing them to re-render with the updated state.
9. Finally, use the data and dispatched functions in your React component to interact with the Redux store. By using the data and dispatch functions in your component, you can interact with the Redux store in a way that makes sense for your specific use case. You can access the state and dispatch actions as needed to keep your component in sync with the store and respond to user interactions. The data obtained from the store and the actions dispatched by the component can be used to trigger updates to the state and re-render the component whenever the state changes.


